The distribution of deformation and therefore strains at the local level are affected when there is the presence of a welded area within mechanical components. The possible presence of defects, for example, cracks, partial or no penetration is to be considered a further factor of disturbance in the distribution of stresses. Measuring the deformations both locally design allows to obtain an optimal dimensioning of the welded joint.
Some researchers have tested some steels known as Q&P intended for the automotive industry that are suitable to the welding operation due to their unstable microstructural conditions. Researchers used a welding technique called Electron Beam, because it is able of limiting thermal alteration and therefore that microstructural. Then they obtained some samples where the welded joint was in the center.
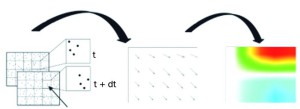
During the test it was used a stereoscopic vision system which is very important, because of the not perfect planarity of the specimens after the welding. The technique is based on the generation of the required pattern of computer, printing on glossy paper specially selected and the carry of the pattern from the paper on the specimen by means of pressure at high temperature. To finish, it was compared to the conventional strain gauge measurement technique and the new methodology 3D DIC getting a good agreement between the two ones.


