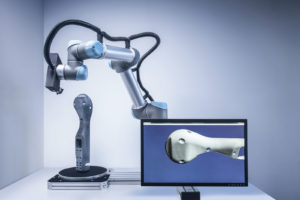
Let’s say the armrest is broken in your vintage car. As things stand, you would need a lot of luck and persistence to find the right spare part. But in the world of Industrie 4.0 and production with batch sizes of one, you can simply scan the armrest and print it out. This is made possible by the first ever 3D scanner capable of working autonomously and in real time. The autonomous scanning system will be on display at the Hannover Messe proper from April 23 to 27, 2018 (Hall 6, Booth A30).
Researchers at the Fraunhofer Institute for Computer Graphics Research IGD are taking the vision of batch sizes of one a big step closer to reality, with a new type of 3D scanning system
“The special thing about our system is that it scans components autonomously and in real time,” says Pedro Santos, department head at Fraunhofer IGD. For the owners of vintage cars with a broken part, this means that the defective component is glued together and placed on a turntable, which is situated beneath a robot arm with the scanner. Everything else happens automatically. The robot arm moves the scanner around the component so that it can register the complete geometry with the minimum number of passes. Depending on the size and complexity of the component, this takes anything from a few seconds to a few minutes. Already while the scan is running, intelligent algorithms create a three-dimensional image of the object in the background. Then a material simulation of the 3D image checks whether a 3D print satisfies the relevant stability requirements. In a final step, the component is printed using a 3D printer and is then ready to be fitted in the vintage car. Santos emphasizes that the real achievement here is not so much the scanner itself, but the combination of the scanner with view planning to form an autonomous system. This view planning technology was also created by Fraunhofer IGD. During an initial scan, algorithms calculate what further scans are necessary so that the object can be recorded with as few scans as possible. Thanks to this method, the system is able to quickly and independently measure objects that are entirely unknown to it. This is a unique selling point, because previous scanners either had to be taught how to do this, or else you had to have the CAD model of the component, making it possible to recognize the position of the object relative to the scanner. If you had taught the scanner to scan a car seat for quality control (TARGET-ACTUAL comparison), then it would be able to scan the next 200 car seats, because they would be largely identical in mass production conditions. But conventional scanners are not suited to the task of handling batch sizes of one. “By contrast, our scan system is able to measure any component, irrespective of its design – and you don’t have to teach it,” explains Santos. “Also, you don’t need information about CAD models or templates – in other words, the specifications of standard forms that a component usually has.”


